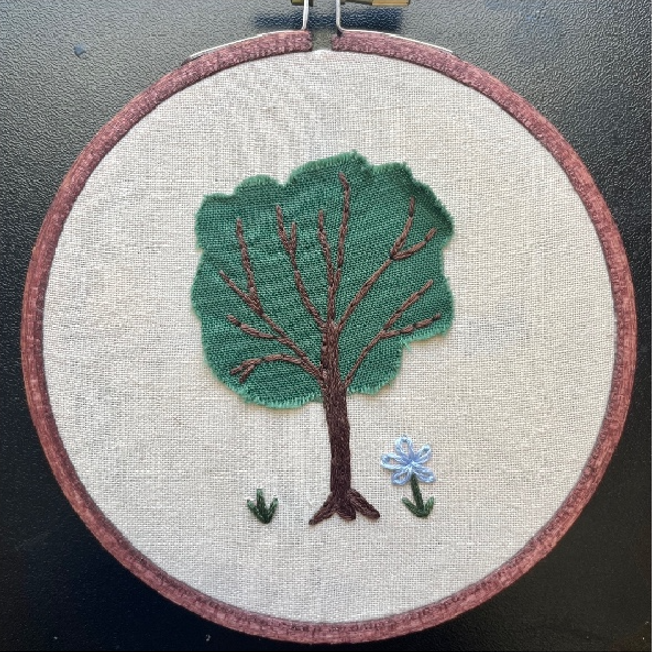
This simple embroidery pattern is perfect for beginners as it required very little knowledge of stitches
For this project, you will just be using the back stitch
Please see General Instructions page for further guidance on embroidery basics, such as separating and knotting your threads.
What You’ll Need
Besides the basics, there are a few extra things you need handy to make this pattern work:
- Small piece of green fabric (roughly 3″x3″) – you can get precut quarters of fabric from hobby stores and Walmart that are perfect for projects like this
- Sulky Sticky Fabri-Solvy – This project uses a bit of this self-adhesive printable water-soluble fabric paper to stick down the green fabric and keep the design intact
- Scissors
Click here to purchase a beginners Stick and Stick pack using this fabric
Use your scissors to cut the fabric into an organic shape. This just means we’re getting rid of all straight lines so it has more of a bush shape. Don’t cut the fabric too small, as we want it to fit around our branches. Take your sticker off it’s backing and gently lay your green fabric directly on the sticky part
.

Tip: place backing the over the very corner of the sticker on the sticky part, this way you can lay you sticker down and use both hands on this part.
When you turn it over you should see your tree forming, take this time to make adjustments but try not to make too many. You’ll then lay your sticker, with the green fabric attached, onto your hoops fabric. Turn it over and press firmly all around.
Colors
For this design, I will be using the following colors, but you can substitute where you like
- Brown: DMC #938
TRUNK/BRANCHES
Using 6 strands of brown
Fill the trunk with a series of long and short stitches overlapping and going vertical up the tree. The more random they are, the more it will look like bark. Outline the branches with that’s called a back stitch. Similar to what you’ve been doing: after one stitch, bring your needle and thread up through the fabric a space away and back down through the spot the last stitch ended in. Making one line. Continue this up and down the branches til they are all formed. You can stop here if you’d like! if you want an extra challenge, continue onto the “Optional” section next.


OPTIONAL
Grass/stem
Using 6 strands of green
Use 3 small/medium stitches to form the grass on one side and again for stem/leaves on the other side, like below.

Flower
Using 3 strands of blue
This stitch is commonly used for flowers, it’s called the lazy.
daisy because it’s so easy.
Starting in the middle of the flower, bring your needle and thread up and back down into the same hole to make a loop but don’t pull it all the way through. Stick your needle back up into where you want the tip of your petal to be, and through this loop. Pull your thread up toward the tip to tighten the loop, and insert your needle back through the fabric right above the loop at the tip to secure it. Do this 5 more times and you have a flower! You’re done stitching! See General Instructions for rinsing off the sticker and backing your piece.


Enjoy!


